Wasabi F3F, the New Kid on the Block
Aviatik Composites makes an impressive debut with their brand new, all-composite ship.
Introduction

The market for all-composite F3F gliders is going well. Just look at the longer delivery times and rising prices from some manufacturers. Moreover, competitors are, in their majority, often very conservative and it is not uncommon that they buy the same glider as their neighbor, not because it is the best glider, but because they do not want to take any risks. As a result, we sometimes approach one-design competition, which is a pity. It is therefore interesting to look at the newcomers and see what they offer. It is with this perspective that I propose you to discover a glider recently introduced on the market, manufactured by Aviatik Composites, based in Slovakia: the Wasabi. We will also check, in the following review, if the performance is as spicy as its name suggests!
Overview

The aerodynamic part of the Wasabi was thought out in collaboration with Dirk Pflug (Pitbull 1 & 2, Quantum, Orden and many other top gliders). The glider has a wingspan of 3M, which is a little more than the usual average, but remains however in the ideal dimension range for slope and F3F. The wing shape is elliptical with rounded wing tips and less pronounced sweep back. The ailerons and control surfaces of the tails are not going all the way for practical reasons according to the manufacturer. The fuselage doesn’t give in to the “slim” fashion and is comparable to a Freestyler 3 or Pike Precision 1 fuselage. It hosts a ballast compartment like the Pitbull 1, in addition to the joiner and wings ballast. We will see later that the fuselage ballast may have its interest.

It is important to note that the Wasabi can easily exceed the FAI limit of 75gr/dm² if all the ballast compartments are full. It is therefore necessary to remain vigilant in competition in order to respect the FAI rules. The Wasabi is proposed in several versions starting from the simple carbon 160 at an attractive entry price, to the double carbon 160/160 while passing by lighter layups such as the simple or double carbon 90. In short, everyone will find a shoe to fit their foot according to flying habits and objectives. Personally, I choose the double carbon 160/90 version which offers a good compromise between robustness and weight. Now let’s have a look at the composition and quality of the kit.
Top Notch Quality!

Once the box was opened, I discovered the Wasabi was perfectly packed (This is an important point because when you know how parcels are transported and handled by the carriers, you don’t sleep at night anymore!!!!) The wings and tails are delivered in their nice protective bags (the fuselage bag is optional), and you can find the nice carbon servo frames and the LDS MP Jet system with all the necessary hardware to mount the servos in the wings. The wiring harnesses partially prepared and welded. The fuselage and wing ballast and spacers (joiner ballast is optional) are included and there is even a neutral adjustment template for the wing and the tail!

Let’s now take a closer look at the molded parts: they are very well made, with very nice paint and burr-free, very clean cut-outs. The wings let us guess an attention to details with, for example, the carbon root rib perfectly made with the opening hole for the green MPX connector. Even the ballast compartment or the joiner box show sharp angles and a mirror-like surface finish! The joiner can be inserted without force and without slop. The wing centering pins are of course already in place. The wing joiner is particularly wide, one-piece and inspires confidence.

On the tail side, there is also a carbon root rib. Elevator horns and centering pins are in place. The only drawback (I had to find something!) is that the ball clevises are not completely freely accessible once the tail is in place. Only 3 or 5 mm are missing for a perfect accessibility.
The fuselage assembly is well advanced since the ballast tube is already installed; the servo plate finished with brass inserts for M2 screws is ready to receive the servos. The fuselage join line is almost invisible showing superb craftsmanship. The elevator control rods are made of Teflon coated fiberglass rods, sliding in a plastic sleeve. Personally, I like this solution which I prefer to the rigid carbon rod. The front fuselage is full carbon which was a bit of a surprise for me. This means that the antennas need to be placed carefully. Now, I guess it must be possible during the order to specify that you want a 2.4 friendly fuselage, which will ease the radio installation. The centering lead is supplied.


All parts mount together easily and fit perfectly once assembled, no slop anywhere, in short a very beautiful kit!


A Quick and Clean Assembly!
I started by preparing and finishing the cable harnesses for the fuselage and wings. The one for the fuselage shares the + and — for 2 servos, which I found useless because it creates an unnecessary point of failure and draws less current. So I changed one of the cables to have 2 x 3 wires per green plug, without sharing the + and the -. This is now fixed according to the manufacturer.
Then, as on all my F3x gliders, before the installation of the green MPX connectors in the fuselage wing root, I always glue two small 1mm plywood plates crossing from side to side with a 2mm recess on each end to serve as a stop when gluing the plugs. I also use a 3D printed template which guarantees that the plug is perfectly positioned and perpendicular to the fuselage wing root while curing.

Mounting the elevator servos in the fuselage is a delight. No holes to drill, no housing to enlarge or adjust, MKS HV6125e servos insert effortlessly, without damaging wires, and are simply screwed with M2 screws. As I didn’t have any screws supplied in my kit (I don’t know if it’s an oversight or if these screws are not supplied) I simply used some Futaba metal servo horn screws that have the right diameter and length and that you can find in a small bag in a specialized store. To finish with the elevator control rods , I mounted the tail on the fuselage, taped the control surfaces to the neutral position with some paper tape, then measured precisely the length to cut and to strip the Teflon layer to glue the brass threaded coupler supplied with some rapid epoxy. I replaced the M2 metal clevises by MP jet plastic/metal clevises which I commonly use on all my gliders and which I am particularly satisfied with because they don’t take any slop over the time.

The fuselage is left aside to complete the assembly of the wings and do the installation of the LDS and servo mounts. First, glue the horns and the epoxy arms on the control surface side, making sure that the arm is well perpendicular to the hinge. Aileron arms are a little shorter than the flap arms because of the servo neutral and the difference in travel. Let’s now move on to the servo frames. In my case, I had to install the brass inserts for the aileron frames because the position of the screw can vary depending on the MKS servos model chosen. For my part, I put the excellent HBL6625 mini. So I drilled at 3 mm and then inserted the brass claw nut with a small hammer.
We can now glue the servo mounts, with the servo in place with its servo head, but without its axis as far as I’m concerned, the frame coming any way to lean against the wing spar. Once dry, I could finish mounting the servos, with the right neutral position offset on the radio. It remains to glue (for those who wish) the green connector at the root, with 2 small wooden wedges behind the rib to increase the gluing surface. When gluing, take care to protect everything with thin tape and release agent (polyvinyl alcohol) so that the plugs do not remain glued together. The glue used is 30 minutes R&G epoxy and cure all night long before to remove the wings from the fuselage, clean the glue excess, remove the tape.

Although the fuselage volume is larger, the available length is limited due to the ballast tube and the required clearance distance. My receiver battery is 2S Lion 18650 in-line. I have shortened the balancing lead by 1cm to gain some space, and I have placed this removed lead on top of the battery. The receiver, a REX6, is located horizontally above the battery, just in front of the servos. The excess wire is hidden underneath. For more detailed pictures, you can retrieve the assembly log photo album here.
In the Air

My Wasabi in double carbon version 160/90 weighs 2.5kg empty, which is a little more (50gr to 100grs) than the weight provided on the manufacturer’s website, but nothing critical here. Please remember that the weight can differ for example depending of the color: White is lighter, orange or red is heavier.
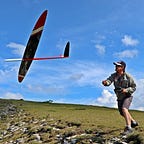
The first flight took place in ideal conditions on a nice welcoming slope and with a good wind. For this first flight, I ballasted the glider for a flying weight just under 2.9kg. As soon as I launched, the Wasabi showed good energy and speed, to the point that I started to do some laps to see the potential. And I was not disappointed to discover a plane showing high speed on trajectory and grip in high load turns, in addition to a real agility and reactivity on the ailerons and the elevator. I was able to do a series of laps without seeing the Wasabi running out of steam.
In lighter conditions, the Wasabi is also doing well, but its weight (2.5kg in my case) however penalizes it a little in turn where it shows more inertia. If we consider that the ideal weight for a wind of 3m/s is about 2.3kg, it means that the glider starts to ‘breathe’ at 5m/s, empty, that we start to ballast it from 6m/s of wind, per 100gr per additional m/s as a first approximation, to be adjusted according to the shape of the slope, its altitude, and its efficiency.
Overall, the Wasabi is really performing well in the F3F task combining an excellent momentum energy restitution, accelerations, and speed retention in turns.


The ballast distribution is not the most convenient for incremental ballasting, but the ballast compartment of the fuselage allows adjusting the balance of the glider by moving the ballast forward or backward, thus allowing whatever the load embarked to remain on the initial CG, this is a good point.
In sport flying, the Wasabi is also very pleasant, as well in thermal ‘hunting’ and circling as in aerobatics. Rolls or 4 point rolls are perfectly centered and the inverted flight can hold endlessly when conditions and the flying volume allow it. Vertical maneuvers are also really good with a large amplitude and good speed. ‘DSing’ the Wasabi is also a joy as you can see on the following video. Plane is empty at 2.5kg and the wind is around 20km/h:
Short landings, thanks to the butterfly mixing, are a piece of cake. Just remember giving some horizontal speed just before touching the ground, especially when the glider is ballasted to avoid the glider hitting the ground heavily and vertically.
In short on the flight chapter, this Wasabi possesses all the qualities you would expect from an all-composite glider of this wingspan.
The year 2020, also called the ‘COVID year’, was very poor to non-existent in terms of F3F competition (no Eurotour or World Cup, no national league except a few competitions before the lock-down or this summer), I unfortunately did not have the opportunity to use it yet. But I’m totally confident that the Wasabi is competitive and will quickly prove its value over time!
The Final Word
To conclude, the Wasabi F3F is a really nice surprise, with top notch kit quality and a glider full of resources, competitive in addition in term of F3F performances. It is a very efficient alternative to gliders usually met on the F3F competition circuit. Its price positioning makes it an even more attractive glider. So, if you are looking for an all-composite glider for F3F competition or more generally dynamic slope flying — because I remind you that these are extremely versatile gliders and well — the Wasabi definitively deserves all your attention. Good flights and happy landings to all of you!
©2021 Pierre RONDEL

Characteristics
- Wingspan: 3000mm
- Length: 1452mm
- Airfoil: DP
- Wing area: 56,2dm²
- Tail area: 5,5dm²
- FAI area: 61.7 dm²
- Max FAI weight: 4627g
- Empty flying weight: from 2250gr to 2500gr
- Manufacturer: aviatikcomposites.sk

Settings

Ballast Sheet

All videos and images by Joël Marin & Pierre Rondel unless otherwise noted. Read the next article in this issue, return to the previous article or go to the table of contents. Downloadable PDFS: just this article or this entire issue.