The Vantage
An F3F design suitable for light conditions while still being race competitive — have Mario Perner and CCM hit the mark?
Introduction
The Vantage is an F3F competition glider designed by Mario Perner from Austria, well known and talented pilot on the F3F scene, also team manager for several years of the national Austrian F3F team.

It is manufactured by CCM (Chekh Composite Models — see Resources below for this and other links mentioned this article) also known for the Optimus F3J model, the Toy, and more recently for the Liberty F5J, and distributed by Mahmoudi Modellsport in Europe. As you probably know, competition is always an eternal quest for un mouton à cinq pattes (‘five-legged sheep’), but at the end is more a story of compromise, so design choices. This is exactly what motivated Mario following the F3F world championship in 2018, when he started to design the Vantage, his second design after the Thor in 2012, wanting a model this time to address weak to medium conditions around and below 50s as a complement of other competition models often more specialized for medium-to-strong conditions. Let’s see in this review if the target has been reached!
Presentation
We are lucky enough that Mario shared in detail on the RC-Network forum his choices and design process, therefore I thought it interesting to quickly summarise them so you know where you go. Main requirements were to carry as much as possible of ballast during the starting phase (pumping), around the turn, and during the whole flight. The Vantage should also track well to avoid multiple correction at the sticks, and the most important, the plane should outperform the best sellers in small conditions and should not conceed too much time to them even in good-to-very-good conditions.

Mario then created a series of five airfoils going from 8.27% to 6.51% of thickness and 1.65 and 1.56% of camber, distributed along the wing and optimised for a coefficient of Ca (ie. axial force) of around 0.25 (typical Ca for a F3F model is between 0.15 and 0.45).


For the tail, Mario started from the well-known and popular TP29 at 7%, which he modified a bit. Curiously, the elevator chord is around 20% only of the tail chord which is unusual, compared to the 30% trend.

Overall, the model is 2980mm wingspan, 1430mm long, and can carry up to 2880g of ballast which is way too much for the max FAI weight.
Kit Inspection
The kit arrived in a solid, five layer cardboard box. Components come in nice bags and the quality of the different parts is absolutely astonishing.

Every detail is just superbly done, join lines are almost invisible, and the paint is beautiful as the colour scheme, in neon orange and red in my case. Fit of the different parts together is second to none, with no blocking point and no slop. In brief, the craftsmanship is just fantastic, the best I have ever seen! Below the weight of the different components:

The Vantage is available in two versions, F3B and F3F, mine being an F3F layup which is made of an outer double layer of spread carbon 40g/m² and some reinforcement at the wing root, AIREX® 71, the inner fabric being a spread carbon 80g/m² with an extra layer of 160g/m² carbon on ailerons and flaps to provide a better stiffness in torsion. Also servo locations receive some carbon reinforcement too. Wings appear really strong and stiff when manipulating them.

No ballast in the fuselage or the wing joiner, a very robust piece of carbon with an inner foam core, everything is in the wings with rear and front compartments. The rear compartment, centered on the centre of gravity (CoG), can host 14 slugs of 140g each, when the front compartment receives 10 slugs of 92g each.
In addition to the amazing finish and fit quality, the noticeable point that really makes the difference is that the Vantage arrives with servo frames and and integrated drive system (IDS) from Servorahmen GmbH, wiring harness and green plugs preinstalled. This makes the assembly must easier and faster, and finally error free!


On my model, the joiner box is surprisingly larger than the joiner by 1mm. I read on a forum that it was on purpose, a design habit coming from the F3J/F5J category, but in F3F it is better to have the joiner tightly maintained in the joiner box because when you land with lot of ballast in the wings, any forward movement of the wing can damage the fuselage. CCM immediately reacted and has already made a new joiner with a new size 34mm which is now delivered in the kit.

The tail joiner is a 5mm diameter carbon rod instead of the usual 6mm rod we can find on most planes. 5mm is more than enough given the 28g of each tail, and light tail plus lighter joiner means less balance lead in the nose. Below, an overview in picture of the kit content and some details:


A Lightning Fast Assembly
Given the state of the kit, the assembly is really quick, very few hours maximum if you take your time. The work on the wings only consists in screwing the servos on the servo frames. I used the MKS HV6130 for flaps and ailerons. I just ground a little bit off the screws before using them in order to be sure that they are not making marks or deformations on the upper side skin. The servos head must be in the correct neutral position. Then I connected the control rod and installed back the metal axis, close the compartment with the transparent servo covers, and that is all!


There is a little more work on the fuselage side. A nice epoxy plate servo tray is provided in the kit. I used it as my two MKS HV6100 servos were fitting well without any modification. The plate is glued in place either with cyanoacrylate or 30-minute epoxy. Then you cut the plastic sleeve and adjust/cut the carbon rod to the correct length before to glue and pinch the threaded couplers on it. I replaced the nice M2 metal clevises by two plastic MP JET clevises because they are thinner, have no slop and fit perfectly in this tiny fuselage without needing any grinding.

To be transparent, I found the elevator servos installation not optimum, losing a lot of horizontal space between the exit of the elevator rods, and between the servos. I think it would be possible to save around 1.5cm on length which would allow placing the receiver vertically between the servo tray and the battery. Without this optimisation, the receiver is placed horizontally, which means you need a tiny receiver such as the REX 6 from JETI or an equivalent from other brands. Some people are removing the receiver case to save even more space, but I don’t like the solution that exposes the receiver too much. Another solution would be to use shorter cells, like the Li-Ion 18500, but you lose capacity, 2000mA instead of 3000mA, so precious flying time. Personally, I stayed with a 2S Li-Ion 18650 battery that offers a full afternoon of flying.

On the CoG electronic scale, I needed 110g of lead in the nose to obtain the 99mm CoG (recommended range is between 98 and 100mm). Finally, the Vantage is weighing 2270g, which is a good weight for a F3F glider, light enough for small conditions.
Aside the model assembly, I have designed and 3D-printed spacers for the two wing ballast compartments, and also two ‘elastic’ spacers of each type.

The Ballast Management mobile application I’m using, developed by my friend Joël Carlin and once provisioned with all the plane and ballast data, indicates that first you load the rear compartment, to reach 4.2kg, while the CoG is not moving. Then you load the front compartment, but only three ballasts are needed to reach the maximum FAI weight. Doing so, you need to remove some lead from the nose as the CoG is moving forward very quickly.
To finish with the assembly, I fixed the difference of size between the wing joiner and the joiner box by gluing a flat carbon profile on the side of the joiner with some cyano, easy fix and perfect fit.
After some radio programming with the usual mixing (four flight modes, snap-flaps, in addition to snap-flaps ratio, butterfly elevator compensation and ailerons differential on digital trims for in flight modifications) it is time to go to the slope and discover the Vantage!

Flying the Vantage
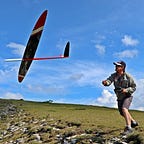
I personally like discovering a new F3F plane during the maiden flight, a mixture of excitement, a little stress, lots of observation; I like to feel the plane and its reactions, trying to understand its temperament before to start to dig into the settings.

The Vantage was first flown for three afternoons, mainly in small conditions around 5m/s. This corresponds to the conditions it was designed for. The lift was smooth and consistent, and I must admit that I was impressed by what I could oversee. In such conditions, with a 2.2 to 2.4kg flying weight, the Vantage accelerates extremely well and quickly, but more than that, keep the speed a long time even with no or little lift on the edge. Bank and yank turns are very tight, fast with no deceleration even with low wind, and I did not notice any tendency to stall even when pulling the stick hard in turn. The plane is precise and agile in any condition, even if I recognize that I have a bit more ailerons than recommended (I like nervous planes). In fact, mechanically, it is possible to achieve much more travel than needed.
Those days, I could also enjoy some thermalling and few aerobatics even if the plane is not primarily designed for this.
The thermal position is working well; the Vantage indicates the lift clearly. Circling is a no brainer and allows gaining altitude quickly. All usual aerobatic manoeuvers are possible, benefiting of the good acceleration, and agility of the plane.

But let’s return to F3F, as few days later, I could fly in a more vertical slope with a wind around 9 to 10m/s, and then I discover a new plane carrying ballast well, able to do upturns or energy management turns pretty well with plenty of energy retention, with a flying weight from 2.9 to 3.2kg. Another good indicator of the efficiency of the airfoils is that, when ‘pumping’, the Vantage is going high with little start altitude.
What I like with the Vantage is that it can adapt easily to the pilot style, or to the slope. One day, you fly the plane smoothly in light conditions with pylon style turn with the less possible of travel along the slope. The next day, in higher wind and different spot, you can fly the plane aggressively, from horizontal to vertical trajectories, the Vantage just delivers!

Mid-June, I had an F3F National team qualifier contest. We have flown nine rounds in various conditions on two different slopes. I switched to the Vantage for the last five rounds and ended at a nice 3rd position in the ranking at the end of the contest despite two very bad rounds at the beginning of the contest, one with 18s of marginal conditions (crossed wind at more 45°). I felt in confidence with the plane and could concentrate on the flying strategy, and trajectories.


Also, ballasting without having to add or remove balance lead from the nose, and this up to 4.2kg is a plus, because in the real life how often are you flying above this weight, once a year maybe?

Some additional videos of the Vantage in action:
Because We Must Conclude
After flying the Vantage in various conditions and different slopes, and in competitions, I can say for sure that the objective to obtain a formidable F3F competition plane has been reached; I must salute Mario’s work on the design. Not only is the Vantage kit quality astonishing, but plane performances are there and do not blush in front of plane references.
Personally, I don’t see the Vantage as only a complement of other planes, because it can be enough on its own and can become your primary competition plane. In short, definitively a nice and competitive plane to own, and to fly!
©2022 Pierre RONDEL

Characteristics

Three View Drawings

Resources
- CCM (Chekh Composite Models)
- Mahmoudi Modellsport
- AIREX® — rigid foam core materials
- MP JET — clevises
- JETI REX 6 — six channel receiver compatible with JETI EX & EX Bus protocols
- Ballast Management — mobile application by Joël Carlin
- RC-Network F3B, F3F, F3J-Modelle — forum with design discussion by Mario Perner
- Servorahmen GmbH — integrated drive system (IDS)
- MKS Servo — HV6130 and HV6100
All videos and images by Joël Marin & Pierre Rondel unless otherwise noted. Read the next article in this issue, return to the previous article in this issue or go to the table of contents. A PDF version of this article, or the entire issue, is available upon request.