Alien
A Carbon Encounter of the Bird Kind
Introduction
The new flying wing designed by Christophe Bourdon and manufactured in Ukraine by Anton Ovcharenko (OA Composites) is aptly named as the concept goes off the usual track. It is a hybrid flying machine borrowing both from the world of the flying wings but also from F3K, intended rather for the slope in light conditions, capable of carrying a lot of ballast and being able to be discus launched. After other best-sellers such as the NRJ, the Strike, and of course the MicroMax reviewed previously on these pages (see Resources, below), we will see if this new flying wing follows the same successfull path!

An Original Design and a Complete Kit
The Alien is a flying wing of 1.20m wingspan with a fairly pronounced forward sweep and a particularly thin airfoil of 6%. It has a short nose, a relatively long rear boom with atotal fuselage length of 590mm. The fin is of the hand-launched type with a sub-fin using a cable control and piano wire spring. The structure of the wing uses the most common technology in F3K competition models: it consists of a core — not Rohacell® as on the MicroMax, but extruded this time — and a spar and a skin made of 40g/dm² bi-axial carbon fabric. The fin is also made of a core with bi-axial fabric. The fuselage is made of carbon fabric, the front of the fuselage and the nose cone being fiberglass so it’s 2.4Ghz compatible. The kit is complete: wing and fuselage, 3D-printed servo frames, 3D-printed ballast tube, carbon plate horns, piano wires and cable for the rudder control. A small, four-pin 90° connector is also provided for the fuselage/wing connection. All the housings of the horns and servos are machined in the wing.


A Demanding Radio Installation
Let’s start with the wing assembly. Flying wings in general, and performance flying wings like the Alien in particular, are not ‘approximate’ radio installations with residual slop here and there. Precision controls and accurate neutral positions are crucial. F3K competition micro-servos are therefore highly recommended. For my part, I opted for the excellent MKS HV75-R in its flat mounting version. The servo housing cut out of the foam offers quite a bit of space, so I was able to create and 3D-print servo frames specific to my model of servos — the frames supplied were not suitable — which avoids gluing the servos directly onto the carbon skin. But before gluing the servo frames into the housing, it is first necessary to prepare the servos arms and the controls of fins with 1.2mm piano wire.


By means of small file I drilled through the foam core gently to allow the control rod to reach the aileron. With a first blank mounting, the exact length between the rudder hole and that of the fin is measured, then the custom bend of the control rod is made, in a ‘Z’ on the servo side and simply bent on the control surface side.
I then installed the wiring to the central angled connector, with removable connectors on the servo side. This takes up more space for sure — when compared to the size of a JR/Futaba connector with the size of the servo itself — but I wanted to keep the possibility of removing the servos if necessary.
The servo’s arm is reworked to have the hole as close as possible to the axis while allowing the necessary travel, but being as short as possible knowing that it is oriented on the skin side.
Once all the elements were ready, I proceeded to glue the servo frame, with the servo in place, screwed on its frame and with control rod connected. Once dry, I glued the control horn connected to the piano wire. Servo covers are made of carbon fabric and they are simply taped with a thin, transparent adhesive tape.


The installation of the DLG-style throwing peg is very classic, on the left wing if you are right-handed and vice versa. Both wings are reinforced on this area of the wing tip. The instructions recommend an angle between 2° and 5°, the gluing being done for my part with some epoxy.

Let’s continue with the fuselage: as with the wing, the servo frame delivered did not correspond to the brand of servos I use, so I took the opportunity to change at the same time the assembly by preferring a flat mount at the bottom of the fuselage rather than on the side. I created and printed the appropriate servo frame for the MKS HV75-R. Being 3D-printed with PLA (polylactic acid) filament—only cyanoacrylate glue works. Epoxy glue, especially, does not stick and will let go at the first shock.
The fin is glued in place with some epoxy, ditto for the rudder carbon horn. Then I installed the piano wire acting as a spring, within the thickness of the hinge. Finally, I gently drilled the hole of the rear boom to let out the control cable, with a crimped cable loop on the rudder control horn side and the same on the servo side. However, I first added a few centimetres of plastic sheath to protect the cable in the first centimetres in the fuselage. Perfectionists may prefer on the servos side a system to adjust the tension, but it is a few extra grams that are added so for my part, I did the simplest.
The ballast tube — if it can be called that! — is sanded and then glued in place with some cyanoacrylate, taking care to centre it on the theoretical CG. A second 3D-printed part, glued to cyanoacrylate glue, closes the wing seat, leaving a hole at the front to route the connector from the receiver. The receiver battery is a 600mA 1S LiPo which allows a good flight time, the servos used will need to be compatible with the use of low voltage — it is necessary to check beforehand when choosing servos.

For the balancing lead, I first moulded an inner nose impression using a hot thermoformable plastic: simply soak this plastic in boiling water so that it softens, then place it in the nose and let it cool. Once the nose print is finished just put aluminum foil around it, then ‘plant’ everything in a pot of sand, remove the nose print leaving the aluminum foil in the ground and pour the right amount of lead, a little below the necessary weight. This will then leave you the possibility to adjust the balancing lead to the nearest gram. I needed about 50g to obtain the recommended CG, this is due to the short nose of the Alien. Finally, the scale indicates 290g empty flying weight. Let’s take the direction of the slope to test all this!
No Less than Three Flying Modes!
What differentiates the Alien from other flying wings is that it has been designed to offer no less than three flight modes to widen its flight range and therefore its versatility. On the other hand, this also means the need for more fine tuning for each flight phase as we will see later.

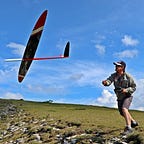
But first let’s talk about the throw: the launch by the wing tip will not cause any problem for the DLG-initiated but will remain more problematic for the beginner (that I am and remain). Because the configuration without stabiliser makes that the Alien is very sensitive to the exit angle of the gesture and corrections to the elevator. One time, the angle is too ‘closed’ and the Alien leaves almost horizontal and another time, the angle is too ‘open’ and the Alien leaves too vertically. This type of throw, however, makes it possible to reach comfortable altitudes allowing to consider more serenely the search for thermals, without however reaching the height of throwing of a competition model.
The Alien requires a little habituation because each phase corresponds to a certain incidence of flight. In the thermal position, and therefore at low speed, the wing flies with increased incidence. The wing remains very healthy and demonstrative while ‘wrapped in a pocket handkerchief’, and yet the controls remain hyper-effective.
In the cruising speed position, the control surfaces are inclined slightly upwards. In this position the Alien favours finesse, transits endlessly and can cover a lot of ground, allowing the exploration of a wide area compared to other models of this size.


The smooth position — aligned control surfaces — corresponds to the speed position. It will be reserved for conditions of stronger wind, ballasted wing, aerobatics or dynamic soaring. In this position the speed increases again and the flight becomes more aggressive and the efficiency of the control surfaces increased.
In aerobatics, the aileron differential setting is crucial. For the roll to be axial it is necessary to have an inverse differential (more downward travel) which is unusual. So, on the cruising flight mode, which also allows to do aerobatics in light air, the dilemma of the reverse differential — or not — arises. A fourth phase of flight can easily be conceived.
But let’s go back to the Alien’s aerobatic capabilities: once correctly set up, single or four point rolls go through without a hitch, loops are ample even in light air, reversals thanks to the efficiency of the fin are very straightforward and inverted flight is easy.
The use of ballast adds even more dynamism and inertia in the trajectories and helps greatly to fight against the wind. I was able to fly in 8m/s to 10m/s of wind without any problem.
On the other hand, in use, I found the ballast system not very convenient: the short nose is quickly filled by the rudder servo, the receiver and the battery. And even if everything fits without too much difficulty, the access to the ballast located under the wing is done by the front and forces in my case to take out the receiver, put or remove the ballast, and put the receiver back.

On the MicroMax, though much less roomy, the ballast is inserted through the wing seat. Of course, the wing must be disassembled, but it is easier and quicker in use. A similar solution on the Alien would have been more convenient.
Overall, the flight envelope is very wide, but it is in light air or light breeze that the Alien outperforms, offering a real pleasure to fly and have great fun.


My Conclusions
Not quite a DLG, but not just a flying wing in the usual sense of the term, the Alien both intrigues and amazes with its outstanding flight performance. The quality of the manufacture is there, but the Alien is nevertheless demanding both during the assembly and during the settings, not accepting any approximations. This is the only way to ensure that the Alien will offer you a wide range of flying possibilities and give you entire satisfaction.
Summary

Specifications

Settings

Finally, this flying wing lives up to its name as it seems to come from another planet — good flights and happy landings to all!
©2023 Pierre RONDEL
Resources
- The Rondel Anthology — The complete works of Pierre Rondel as they have appeared on the pages of the New RC Soaring Digest.
- MicroMAX, the Pocket F3F! by Pierre Rondel. — “The MicroMAX is a project initiated by Henning Schmidt, designed by Christophe Bourdon and manufactured by Anton Ovcharenko (OA Composites)…”
- HV75-R from MKS Servo. — “founded [in] 1999, we specialize in research, design and development of RC model servos, all kinds of gear boxes and electronic control equipment…”
All images and videos by Joël Marin and Pierre Rondel. Read the next article in this issue, return to the previous article in this issue or go to the table of contents. A PDF version of this article, or the entire issue, is available upon request.